从 Nuxt.js 官方指南学习如何使用
版本:2.14.0
npx create-nuxt-app <project-name>
如何升级?
- 查看最新版本
- 更新
package.json文件中的nuxt - 删除
package-lock.json文件 - 删除
node_modules路径 - 运行
npm install
使用了 vuetify 作为组件库,详情查看@nuxtjs/vuetify:
-
自定义变量
customVariables// assets/variables.scss // Variables you want to modify $btn-border-radius: 0px; // If you need to extend Vuetify SASS lists $material-light: ( cards: blue ); @import '~vuetify/src/styles/styles.sass';// nuxt.config.js export default { vuetify: { customVariables: ['~/assets/variables.scss'] } } -
默认资源
defaultAssets{ font: { family: 'Roboto' }, icons: 'mdi' } -
Vuetify 的选项支持
optionsPath所有的 Vuetify 选项都是支持的,可以写在
vuetify.options.js文件中,如需访问 Nuxt 环境,则需导出函数:// vuetify.options.js export default function ({ app }) { return { lang: { t: (key, ...params) => app.i18n.t(key, params) } } } // nuxt.config.js export default { vuetify: { optionsPath: './vuetify.options.js' } }
基于 pages 文件夹中的 Vue 文件的组织方式。
使用 NuxtLink 组件导航到不同页面,内部链接都应采取这种方式,外部链接则应使用 <a> 标签。
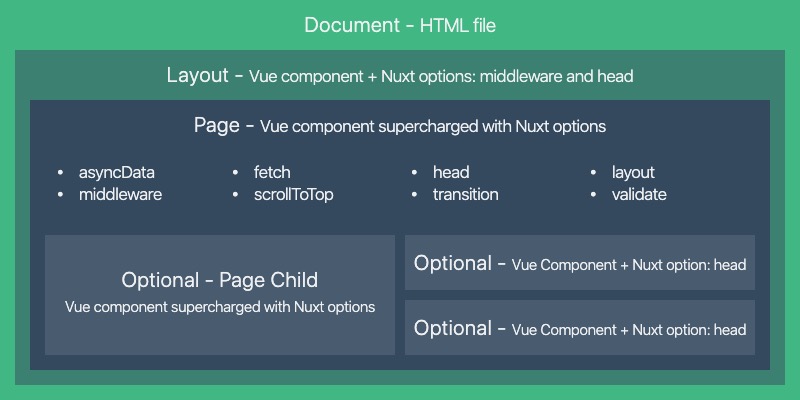
存放页面,并生成路由。也可以编写 js 文件创建路由。每个 Page 组件都是 Vue 组件,但是 Nuxt 增加了一些特别的属性和函数。
-
动态页面
-
需要在 Vue 文件名或目录前加
_下划线<template> <h1>{{ this.book }} / {{ this.slug }}</h1> </template> <script> export default { // page properties go here async asyncData({ params }) { const book = params.book const slug = params.slug return { book, slug } } } </script>
-
-
属性
- 先回顾一下 vue 的组件属性都有哪些?
- name:组件名
- components:局部组件注册
- props:传递的一些 property,一般是父传子,还可以在 vue-router 中进行路由组件传参
- data:绑定的值,组件的 data 必须是函数以维护不同的拷贝
- computed:计算属性
- methods:事件处理方法,里面可以映射 vuex 相关方法、还可以自定义事件让父组件监听
- 其他一些生命周期方法,如 mounted、created等
- asyncData( context ){ return { name: ‘world’}}:每次加载组件前都会调用
- fetch() {} :加载异步数据可用,服务端渲染路由时、客户端导航时 ( Data Fetching chapter)
- head() {} :当前页面特定的 tags (Meta Tags and SEO chapter)
- layout :指定一个页面布局( Views chapter)
- loading :可手动配置加载行为 ( Loading chapter, Custom Page Loading example)
- transition :指定一个页面过度效果(Transitions chapter)
- scrollToTop :指明渲染页面前是否滚动到顶部,默认子路由不滚动(重写默认滚动效果 scrollBehavior option)
- middleware :指明一个中间件,将在渲染页面前调用(Middleware chapter)
- watchQuery :默认关闭,开启后后添加同名方法,根据方法返回值决定是否重新调用所有组件方法
- 先回顾一下 vue 的组件属性都有哪些?
-
忽略页面
- 添加
-中划线前缀就不会自动生成路由( ignore option )
- 添加
-
配置
- 可重命名
pages目录名( dir option )
- 可重命名
存放所有可导入页面的组件,nuxt 可以自动导入而不用手动 import。
-
获取数据 (fetch())
-
要用 API 获取数据,需要使用 fetch() 方法,可使用
$fetchState.pending与$fetchState.error,加上v-if显示:<template> <div> <p v-if="$fetchState.pending">Loading....</p> <p v-else-if="$fetchState.error">Error while fetching mountains</p> <ul v-else> <li v-for="(mountain, index) in mountains" :key="index.id"> {{ mountain.title }} </li> </ul> </div> </template> <script> export default { data() { return { mountains: [] } }, async fetch() { this.mountains = await fetch( 'https://api.nuxtjs.dev/mountains' ).then(res => res.json()) } } </script>
-
-
组件路径( components module )
-
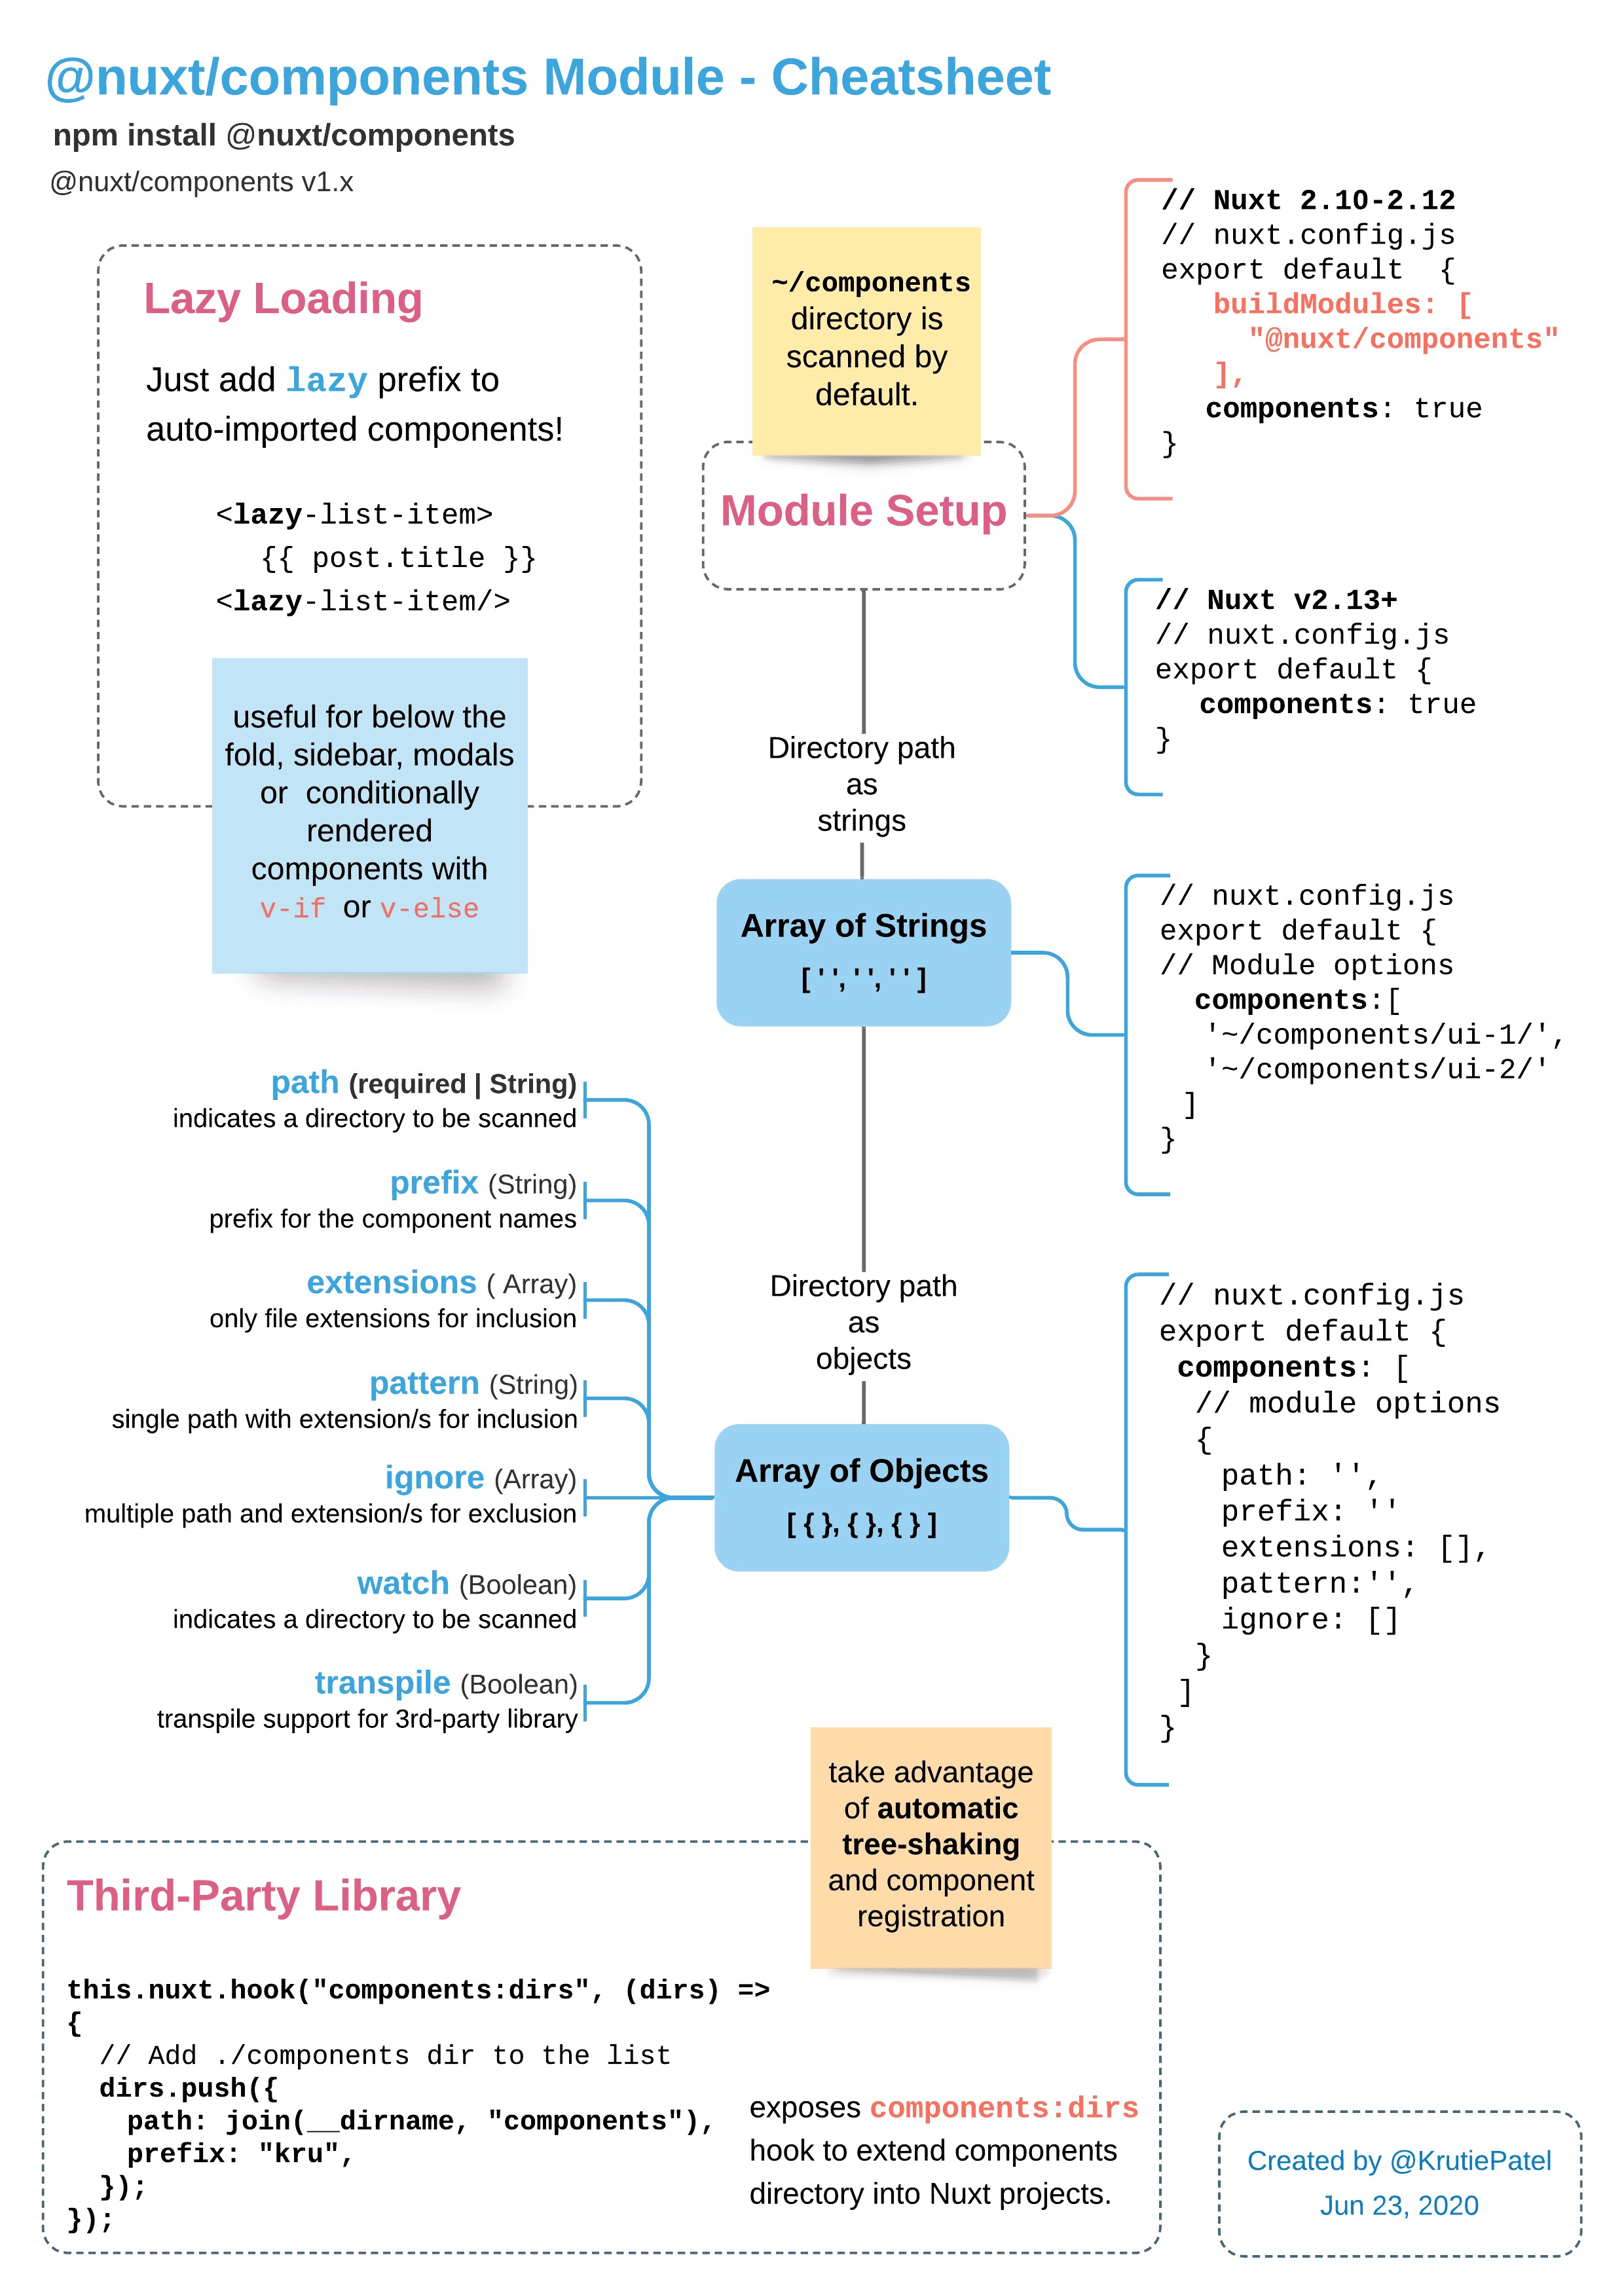
自动导入:2.13 开始,可以自动导入组件,只需添加
components: true -
动态导入(懒加载):组件名加上
Lazy前缀<template> <div> <h1>Mountains</h1> <LazyMountainsList v-if="show" /> <button v-if="!show" @click="showList">Show List</button> </div> </template> <script> export default { data() { return { show: false } }, methods: { showList() { this.show = true } } } </script> -
路径嵌套:直接是原组件名,推荐组件名字上加个路径名,也可以全局配置
// nuxt.config.js components: { dirs: [ '~/components', { path: '~/components/base/', prefix: 'Base' } ] } -
组件模块

-
存放为编译的资源,如样式文件、图片、字体等。
-
图片:加上
~小波浪线 (webpack Assets)<img src="~/assets/your_image.png" />background: url('~assets/banner.svg');<img :src="require(\~/assets/img/${image}.jpg`)" />`
-
样式
- 可增加全局样式,
sass需添加node-sass和sass-loader依赖
- 可增加全局样式,
-
字体 (添加谷歌字体 Meta Tags and SEO chapter)
@font-face { font-family: 'DM Sans'; font-style: normal; font-weight: 400; font-display: swap; src: url('~assets/fonts/DMSans-Regular.ttf') format('truetype'); } -
webpack 资源
- assets 下使用 vue-loader, file-loader , url-loader
- static 下将直接拷贝到根目录
-
webpack (改配置 build.extend)
-
别名
- source 目录:
~,@也可以,但是不总是有用的(例如css中图片背景) - root 目录:默认与 source 目录一致,可使用
~~或@@表示
- source 目录:
文件将直接映射到服务器的root下,名字什么的都不会有任何改变。
对诸如robots.txt, sitemap.xml or CNAME 比较有用。
在使用的时候其地址直接以 / 开头。
<!-- Static image from static directory -->
<img src="/my-image.png" />

<!-- webpacked image from assets directory -->
<img src="@/assets/my-image-2.png" />
Nuxt 的配置文件,增减模块在此。
-
build :设置包括
loaders,filenames,webpack配置 和transpilation。(build property) -
css :全局css( css property)
-
dev :定义
development或production模式(dev property) -
env:定义客户端和服务端都可以用的环境变量( env property)
-
generate :设置一些值(generate property)
-
head :定义所有默认的 meta 标签(head integration)
-
loading:配置默认的 loading 组件(loading integration)
-
module:增加模块( modules property)
-
plugins:定义在实例化 Vue 之前运行的 js 插件(plugins property)
-
router:重写默认 Vue-Router 的配置( router property)
-
server:配置一些供服务端用的变量(server property)
-
srcDir:定义源文件目录名
-
dir:自定义目录名( dir property)
-
pageTransition:定义默认页面动效(transition property)
其他配置文件: .eslintrc, prettier.config.json or .gitignore 。
其他有帮助的目录和文件,包括 content, layouts, middleware, modules, plugins and store 。

可定义默认布局:default.vue,这将应用与没有指定 布局 的页面,<Nuxt /> 即是渲染的页面组件。( Nuxt component )
<template>
  <Nuxt />
</template>
布局的名字就是你创建的布局文件的名字。
尽管放在 layouts 文件夹,但应以 page 对待。
自定义 APP 模板的用处是添加条件 css for ie :
<!DOCTYPE html>
<!--[if IE 9]><html class="lt-ie9 ie9" {{ HTML_ATTRS }}><![endif]-->
<!--[if (gt IE 9)|!(IE)]><!--><html {{ HTML_ATTRS }}><!--<![endif]-->
  <head {{ HEAD_ATTRS }}>
    {{ HEAD }}
  </head>
  <body {{ BODY_ATTRS }}>
    {{ APP }}
  </body>
</html>
`
context 对象仅在特定函数中有用: asyncData, plugins, middleware and nuxtServerInit,它提供了关于当前请求的额外信息。
function (context) { // Could be asyncData, nuxtServerInit, ...
  // Always available
  const {
    app, // 包括所有插件的根Vue实例选项。例如,在使用i18n时,可以通过context.app.i18n访问$i18n
    store,  //Vuex存储实例。只有在设置了vuex时才可用
    route,  // Vue-Router 路由实例
    params, // route.params 的别名
    query,  // route.query 的别名
    env,  // nuxt.config.js 中设置的环境变量。查看env api。
    isDev,  // 可以让您知道是否处于dev模式,这对于在生产中缓存一些数据很有用。
    isHMR,  // 让您知道是否从webpack热模块替换中调用了方法/中间件(仅在开发模式下的客户端上为true)。
    redirect,  // 使用此方法将用户重定向到另一条路由,服务器端使用状态码,默认为302。redirect([status,] path [, query])。
    error  // 使用此方法显示错误页面:error(params)。参数应该有属性statusCode和消息。
  } = context

  // Only available on the Server-side
  if (process.server) {
    const { req, res, beforeNuxtRender } = context
    // 如果使用Nuxt作为中间件,req res对象可能会根据所使用的框架而有所不同。
    // beforeNuxtRender(fn) 用于更新客户端的 __NUXT__ 变量, fn 可异步,有个例子
  }

  // Only available on the Client-side
  if (process.client) {
    const { from, nuxtState } = context
    // nuxtState,对于使用beforeNuxtRender在水合之前在客户端获取nuxt状态的插件很有用。 仅在通用模式下可用。
  }
}
context 中的关键字 已在 Internals Glossary 中介绍。
context.params,ES6 可以用解构。
直接store.state.authenticated
通过 this.$nuxt 或 window.$nuxt (可在 Vue 组件之外访问)
- 互联网连接检查:
$nuxt.ifOffline或$nuxt.ifOnline - 访问 root 实例:
$nuxt - 刷新页面数据:
$nuxt.refresh()刷新asyncData或fetch - 控制 loading 条:
$nuxt.$loading.finish()、$nuxt.$loading.start()
如果想在 Nuxt 加载完成后运行一些脚本,可以使用 window.onNuxtReady( call ) 函数
Nuxt 在全局 process 对象中注入了3个布尔值,以方便确定app是运行在服务端还是客户端。
process.client 、process.server
JS 环境必须有,故 Node 环境要配置好
通过 serverMiddleware 来控制和扩展服务端
// middleware/api/logger.js
export default function (req, res, next) {
  console.log(req.url)
  next()
}
// nuxt.config.js
export default: {
  serverMiddleware: [
     '~/api/logger'
  ]
}
在 Node 环境就可以访问 Node 对象,诸如 req 和 res ,但是不能访问 window 和 document 对象,因为他们属于 浏览器 环境。然而,你可以通过使用 beforeMount 和 mounted 钩子函数来使用 window 和 document。
- 浏览器 to 服务端:浏览器发送请求命中之后,Nuxt 生成 HTML 并将执行的函数的结果(如
asyncData、nuxtServerInit或fetch等)发送给浏览器,一些钩子函数也将执行。 - 服务端 to 浏览器:浏览器收到服务端发来的渲染好的页面,然后开始集成 Vue ,页面即可交互。
- 浏览器 to 浏览器:使用
<NuxtLink>在页面间导航是客户端完成的,不需要访问服务端,除非你刷新浏览器。

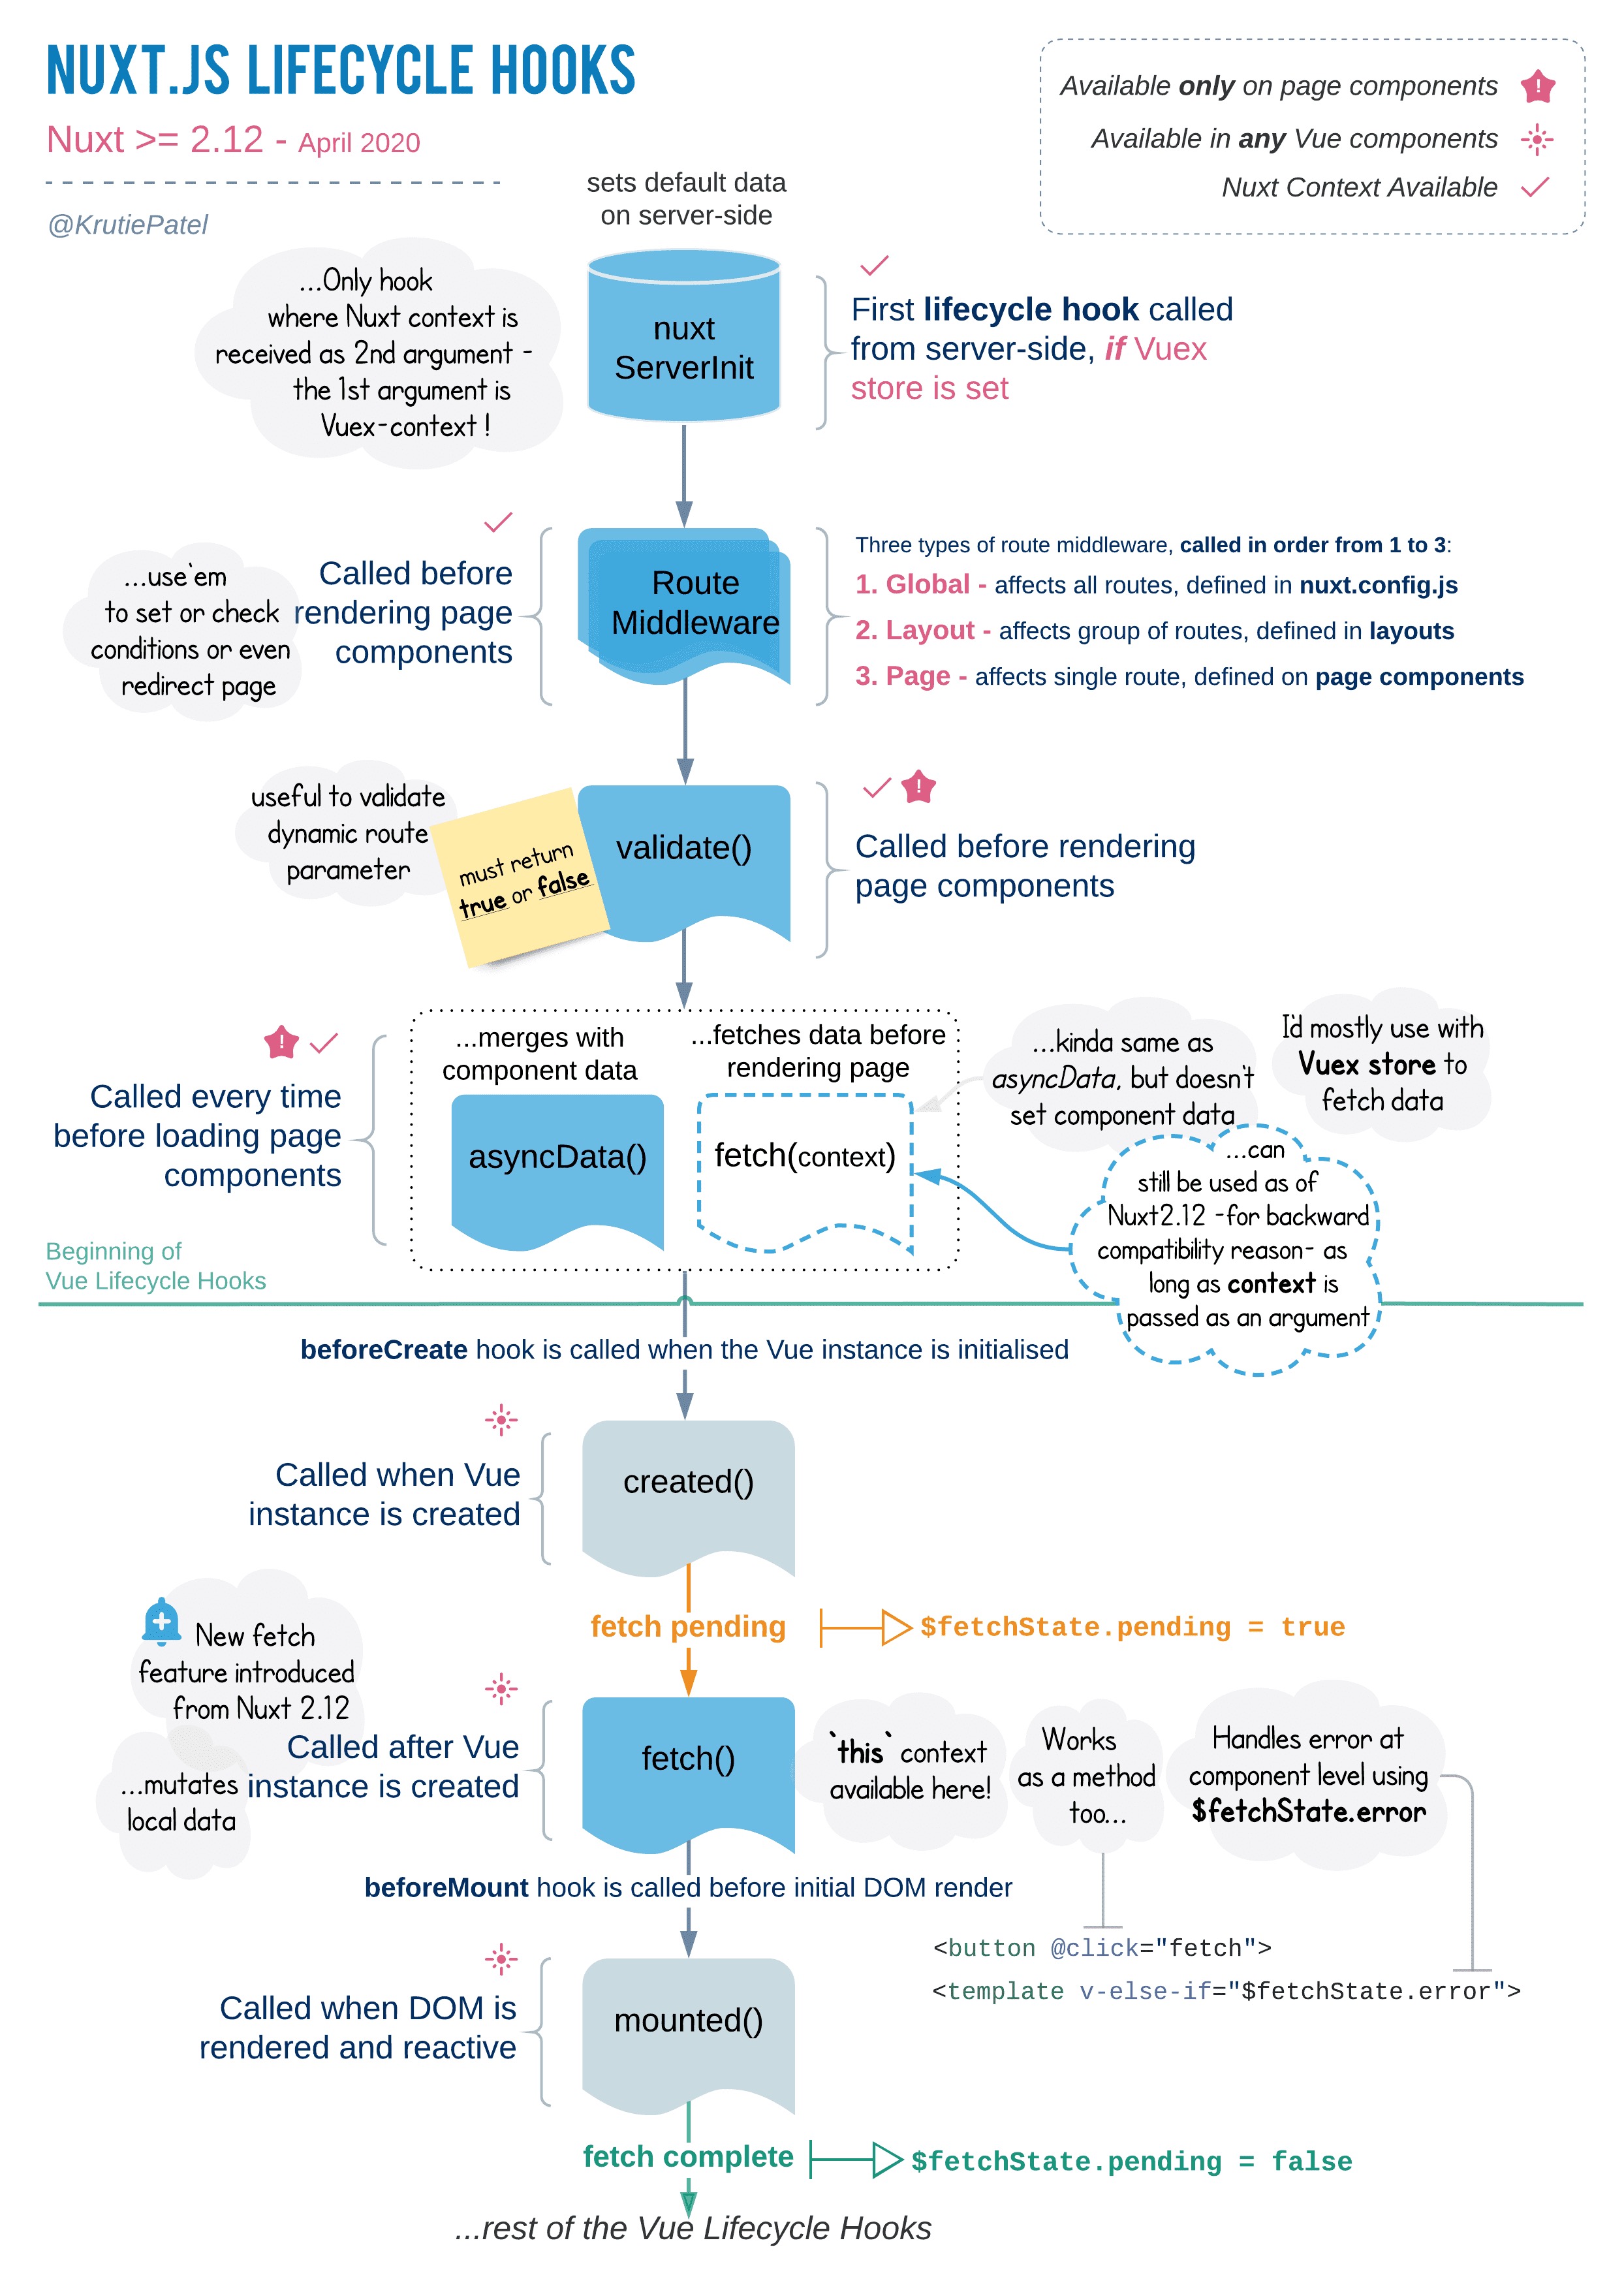
- 服务器启动(
nuxt start) - 生成进程启动(
nuxt generate) - Nuxt hooks
- serverMiddleware
- Server-side Nuxt plugins:
nuxt.config.js中定义的顺序 - nuxtServerInit:Vuex action 被调用,先 Vuex Context 然后 Nuxt Context,只能在
store/index.js中定义。 - Middleware:全局的、布局的、路由的
- ayncData
- beforeCreate(Vue lifecycle method)
- Created(Vue lifecycle method)
- The new fetch (top to bottom, siblings = parallel)
- Serialization of state (
render:routeContextNuxt.js hook) - HTML 渲染 (
render:routeNuxt.js hook) render:routeDonehook 当 HTML 被发送给浏览器generate:beforeNuxt.js hook- HTML files are generated:
generate:page(HTML editable)generate:routeCreated(Route generated) generate:done当所有 HTML 文件被生成
不管哪种模式,都会执行。
- 收到 HTML
- 加载资源(如js)
- Vue 整合
- Middleware:全局的、布局的、路由的
- asyncData(blocking)
- Client-side Nuxt plugins:
nuxt.config.js中定义的顺序 - beforeCreate(Vue lifecycle method)
- created (Vue lifecycle method)
- The new fetch (top to bottom, siblings = parallel) (non-blocking)
- beforeMount (Vue lifecycle method)
- mounted (Vue lifecycle method)
对于客户端,只有通过 <NuxtLink> 导航的才是都准备好在浏览器运行的,此外,知道所有的阻塞任务都完成之后才会显示页面。
- middleware (blocking):全局的、布局的、路由的
- asyncData (blocking)
- asyncData (blocking) [or full static payload loading]
- beforeCreate & created (Vue lifecycle methods)
- fetch (non-blocking)
- beforeMount & mounted
Universal & SPA
// nuxt.config.js
export default {
  mode: 'universal' // default universal
}
server & static
// nuxt.config.js
export default {
  target: 'server'
}
在 pages 目录下的都是自动路由的。
URL path 上没有变量。
有变量,只需要加上 _ 下划线。
一般_id.vue都是 _id? 表示可选,要必须的话,就应该是_id/index.vue这种,即利用文件夹和index.vue表示。
本地访问路由参数使用:this.$route.params.{parameterName}
也就是有一个users.vue文件(内含<NuxtChild>)外还有个相同名字 的文件夹users,其下有不同的组件,一个典型的例子:
pages/
--| users/
-----| _id.vue
-----| index.vue
--| users.vue

// 自动生成
router: {
  routes: [
    {
      path: '/users',
      component: 'pages/users.vue',
      children: [
        {
          path: '',
          component: 'pages/users/index.vue',
          name: 'users'
        },
        {
          path: ':id',
          component: 'pages/users/_id.vue',
          name: 'users-id'
        }
      ]
    }
  ]
}
一个典型的例子:
pages/
--| _category/
-----| _subCategory/
--------| _id.vue
--------| index.vue
-----| _subCategory.vue
-----| index.vue
--| _category.vue
--| index.vue

// 自动生成
router: {
  routes: [
    {
      path: '/',
      component: 'pages/index.vue',
      name: 'index'
    },
    {
      path: '/:category',
      component: 'pages/_category.vue',
      children: [
        {
          path: '',
          component: 'pages/_category/index.vue',
          name: 'category'
        },
        {
          path: ':subCategory',
          component: 'pages/_category/_subCategory.vue',
          children: [
            {
              path: '',
              component: 'pages/_category/_subCategory/index.vue',
              name: 'category-subCategory'
            },
            {
              path: ':id',
              component: 'pages/_category/_subCategory/_id.vue',
              name: 'category-subCategory-id'
            }
          ]
        }
      ]
    }
  ]
}
更广泛的匹配,匹配不了确定的请求我就用你啦,使用 _.vue,例如 404 就用了这种方式实现。
pages/
--| people/
-----| _id.vue
-----| index.vue
--| _.vue
--| index.vue

// 将会处理:
/ -> index.vue
/people -> people/index.vue
/people/123 -> people/_id.vue
/about -> _.vue
/about/careers -> _.vue
/about/careers/chicago -> _.vue
- router-extras-module :在页面内自定义路由参数
- @nuxtjs/router :该组件可重写 Nuxt 路由,需要你写
router.js - router.extendRoutes :
nuxt.config.js中的属性
用于自定义 Nuxt 的路由:
// nuxt.config.js
export default {
  router: {
    // customize the Nuxt.js router
    base: '/app/'  // 整个APP在这个PATH下服务
    extendRoutes(routes, resolve) {  // 扩展路由
      routes.push({
        path: '/users/:id',
        components: {
          default: resolve(__dirname, 'pages/users'), // or routes[index].component
          modal: resolve(__dirname, 'components/modal.vue')
        },
        chunkNames: { // 命名视图需要
          modal: 'components/modal'
        }
      })
    },
    scrollBehavior // 等配置项
  }
}
在 Nuxt 中从 API 获取数据有两种方式:fetch 和 asyncData。
服务端组件实例化之后调用,this可用。
export default {
  async fetch() {
    console.log(this)
  }
}
如果要访问 context 可使用 匿名中间件(fetch(context)已弃用,但是可以用 this.$nuxt.context获取),即一个函数或函数数组,例如:
<template>
  <h1>Secret page</h1>
</template>

<script>
  export default {
    middleware({ store, redirect }) {
      // If the user is not authenticated
      if (!store.state.authenticated) {
        return redirect('/login')
      }
    }
  }
</script>
每次需要获取异步数据的时候,服务端渲染路由时调用、客户端导航时调用。
它暴露了 $fetchState 可在组件级别获取以下属性:pending (客户端调用fetch时来个占位符)、error、timestamp。
以及 $fetch()函数,可在组件中使用。
<template>
  <p v-if="$fetchState.pending">Fetching mountains...</p>
  <p v-else-if="$fetchState.error">An error occured :(</p>
  <div v-else>
    <h1>Nuxt Mountains</h1>
    <ul v-for="mountain of mountains">
      <li>{{ mountain.name }}</li>
    </ul>
    <button @click="$fetch">Refresh</button>
  </div>
</template>

<script>
  export default {
    data() {
      return {
        mountains: []
      }
    },
    async fetch() {
      this.mountains = await fetch(
        'https://api.nuxtjs.dev/mountains'
      ).then(res => res.json())
    }
  }
</script>
fetchOnServer :布尔值,为假时只能在客户端调用fetch
fetchDelay : 默认 200 ms,最小执行时间
export default {
  data() {
    return {
      posts: []
    }
  },
  async fetch() {
    this.posts = await fetch('https://api.nuxtjs.dev/posts').then(res =>
      res.json()
    )
  },
  // call fetch only on client-side
  fetchOnServer: false
}
默认不会监听查询字符串的改变,如果要监听的话,需要加一个$route.query上的监视器并调用 $fetch。
export default {
  watch: {
    '$route.query': '$fetch'
  },
  async fetch() {
    // Called also on query changes
  }
}
您可以在 <nuxt /> 和 <nuxt-child /> 组件中使用 keep-alive 指令来保存已访问页面的调用,还可通过向 <nuxt> 组件传递一个属性: keep-alive-props来指定传递给 <keep-alive> 的。
<nuxt keep-alive :keep-alive-props="{ max: 10 }" />
表示仅在内存中保存 10 页组件。
Nuxt 自动填充 this.$fetchState.timestamp,然后你可以结合 activated 来给fetch增加 30 秒缓存:
<template>
  ...
</template>

<script>
  export default {
    data() {
      return {
        post: {}
      }
    },
    activated() {
      // Call fetch again if last fetch more than 30 sec ago
      if (this.$fetchState.timestamp <= Date.now() - 30000) {
        this.$fetch()
      }
    },
    async fetch() {
      this.posts = await fetch('https://api.nuxtjs.dev/posts').then(res =>
        res.json()
      )
    }
  }
</script>
如果最后一次取回是在30秒之内,那么导航到同一页面将不会调用 $fetch。
仅用于 pages 即页面组件,且无法获取 this。
与 fetch 最主要的区别是 不必要 处理任何 pending 状态 或 error。Nuxt 将等待 asyncData 完成然后才会导航到下一个页面或者显示错误页面。
该钩子函数将 context 作为第一个参数,可使用它来获取一些数据,Nuxt 将自动把它返回的数据与组件 data 数据合并。
接下来使用 [@nuxt/http](https://http.nuxtjs.org/) 模块获取数据,这也是我们推荐的(首先安装它,然后在 nuxt.config.js modules 中写上它)。
<template>
  <div>
    <h1>{{ post.title }</h1>
    <p>{{ post.description }}</p>
  </div>
</template>

<script>
  export default {
    async asyncData({ params, $http }) {
      const post = await $http.$get(`https://api.nuxtjs.dev/posts/${params.id}`)
      return { post }
    }
  }
</script>
默认当然是不监听了,使用 watchQuery属性。
3种方式添加元数据:
- 全局:
nuxt.config.js - 使用
head属性对象 - 使用
head函数:这样可以访问 data 和 computed 属性
// 对象
export default {
  head: {
    title: 'Home page',
    meta: [
      {
        hid: 'description',
        name: 'description',
        content: 'Home page description'
      }
    ],
  }
}

// 函数
head() {
  return {
    title: this.title,
    meta: [
      {
        hid: 'description',  // 避免子组件出现重复
        name: 'description',
        content: 'Home page description'
      }
    ]
  }
}
外部资源可以添加在 head 中,详见 vue-meta 文档。
使用 nuxt.config.js 文件覆盖默认配置。
nuxt.config.js 的 loading 属性:
| color | String | ‘black’ | CSS color of the progress bar | |
|---|---|---|---|---|
| failedColor | String | ‘red’ | CSS color of the progress bar when an error appended while rendering the route (if data or fetch sent back an error for example). | |
| height | String | ‘2px’ | Height of the progress bar (used in the style property of the progress bar) | |
| throttle | Number | 200 | In ms, wait for the specified time before displaying the progress bar. Useful for preventing the bar from flashing. | |
| duration | Number | 5000 | In ms, the maximum duration of the progress bar, Nuxt.js assumes that the route will be rendered before 5 seconds. | |
| continuous | Boolean | false | Keep animating progress bar when loading takes longer than duration. | |
| css | Boolean | true | Set to false to remove default progress bar styles (and add your own). | |
| rtl | Boolean | false | Set the direction of the progress bar from right to left. |
export default {
  loading: false
  // 或者
  loading: {
    color: 'blue',
    height: '5px'
  }
}
export default {
  mounted() {
    this.$nextTick(() => {  // 必须包裹这个函数
      this.$nuxt.$loading.start()
      setTimeout(() => this.$nuxt.$loading.finish(), 500)
    })
  }
}
该组件必须公开这些方法:
| Method | Required | Description |
|---|---|---|
| start() | Required | Called when a route changes, this is where you display your component. |
| finish() | Required | Called when a route is loaded (and data fetched), this is where you hide your component. |
| fail(error) | Optional | Called when a route couldn’t be loaded (failed to fetch data for example). |
| increase(num) | Optional | Called during loading the route component, num is an Integer < 100. |
<template>
  <div v-if="loading" class="loading-page">
    <p>Loading...</p>
  </div>
</template>

<script>
  export default {
    data: () => ({
      loading: false
    }),
    methods: {
      start() {
        this.loading = true
      },
      finish() {
        this.loading = false
      }
    }
  }
</script>

<style scoped>
  .loading-page {
    position: fixed;
    top: 0;
    left: 0;
    width: 100%;
    height: 100%;
    background: rgba(255, 255, 255, 0.8);
    text-align: center;
    padding-top: 200px;
    font-size: 30px;
    font-family: sans-serif;
  }
</style>
export default {
  loading: '~/components/LoadingBar.vue',
  // indicator 用于第一次加载,SPA
  loadingIndicator: {
    name: 'circle',  // 内置了很多 indicators
    color: '#3B8070',
    background: 'white'
  }
}
<Nuxt :nuxt-child-key="someKey" />:显示 Page 组件,用于 layouts<NuxtChild :foobar="123" />:显示嵌套路由中的子组件- 以上两个都接受
keep-alive和keep-alive-props。(vue docs) <NuxtLink to="/">Home page</NuxtLink>。( Vue Router documentation )- 自动预抓取
nuxt-link-active这个类属性,可以用于css给活动的链接加点料,当然也可以自定义它的名字nuxt-link-exact-active精确匹配<client-only placeholder="Loading..."></client-only>用于仅在客户端渲染的组件
可在页面组件添加:
export default {
  // Can be a String
  transition: 'home'
  // Or an Object
  transition: {}
  // or a Function
  transition (to, from) {}
}
String 的话,会使用名为 name 的组件(这是自动完成的,你不需要添加这个组件到 vue 文件中):
<transition name="home"></transition>
现在你需要添加一些新的类:
<styles>
  .home-enter-active, .home-leave-active { transition: opacity .5s; }
  .home-enter, .home-leave-active { opacity: 0; }
</styles>
还可以添加全局配置,需要一个跨路由共享的 css 文件。
以及关于布局过渡的设置:
// nuxt.config.js
export default {
  layoutTransition: 'my-layouts'
  // or
  layoutTransition: {
    name: 'my-layouts',
    mode: 'out-in'
  }
}
/* assets/main.css */
.my-layouts-enter-active,
.my-layouts-leave-active {
  transition: opacity 0.5s;
}
.my-layouts-enter,
.my-layouts-leave-active {
  opacity: 0;
}
页面过渡属性:
// nuxt.config.js
export default {
  pageTransition: 'my-page'
  // or
  pageTransition: {
    name: 'my-page',
    mode: 'out-in',
    beforeEnter (el) {
      console.log('Before enter...');
    }
  }
}
/* assets/main.css */
.my-page-enter-active,
.my-page-leave-active {
  transition: opacity 0.5s;
}
.my-page-enter,
.my-page-leave-to {
  opacity: 0;
}
在服务器端创建组件实例后,将调用 fetch。 这样就可以在提取中使用this上下文。
在这个上下文的帮助下,fetch 能够直接改变组件的数据。这意味着我们可以直接设置组件的本地数据,而不必分派Vuex存储操作或提交页面组件的 mutation。
- 使用 fetch,可以直接从布局组件进行API调用。
- Fetch钩子在服务器端调用一次(在对Nuxt应用程序的第一个请求上),然后在导航到进一步路由时在客户端调用。但是由于我们可以为每个组件定义一个获取钩子,因此获取钩子是按照它们的层次结构顺序调用的。
- 此外,如果需要,我们甚至可以在服务器端禁用fetch。
export default {
  fetchOnServer: false
}
fetch钩子还充当一种方法,可以在用户交互时调用,也可以通过编程方式从组件方法调用。
// from component methods in script section
export default {
  methods: {
    refresh() {
      this.$fetch()
    }
  }
}
就页面组件而言, fetch看起来非常类似于asyncData(),因为它们都处理本地数据。
- 仅对 Page 组件有效
this不可用- 通过 return 数据来添加 payload
export default {
  async asyncData(context) {
    const data = await context.$axios.$get(
      `https://jsonplaceholder.typicode.com/todos`
    )
    // `todos` does not have to be declared in data()
    return { todos: data.Item }
    // `todos` is merged with local data
  }
}
- fetch 在所有 Vue 组件中都可用
this上下文可用- 简单地 mutate 本地数据
export default {
  data() {
    return {
      todos: []
    }
  },
  async fetch() {
    const { data } = await axios.get(
      `https://jsonplaceholder.typicode.com/todos`
    )
    // `todos` has to be declared in data()
    this.todos = data
  }
}
[1] Nuxt Guides
